
Optimizing PC Performance: Avoid Gaming Disruptions with Windows, Alt+Tab & Sticky Keys

Optimizing PC Performance: Avoid Gaming Disruptions with Windows, Alt+Tab & Sticky Keys
Quick Links
Key Takeaways
- If the Windows key is causing interruptions during your gaming session, you can disable it through the Registry Editor, Local Group Policy Editor, Microsoft PowerToys, or by using your keyboard software.
- You can use Microsoft PowerToys or AutoHotkey to disable the ALT+Tab shortcut on Windows.
- If you don’t want Sticky Keys to interrupt you, you can disable it through the Settings menu.
Windows is designed for general computer use, not specifically for gaming. The Windows key, Alt+Tab, and other keyboard shortcuts like Sticky Keys can pull you out of full-screen games and bring you back to the desktop. Luckily, it’s very easy to disable them, so you can enjoy uninterrupted gaming sessions.
How to Disable the Windows Key
There are a couple of methods by which you can disable the Windows key on your Windows PC. Let’s check out all the methods in detail:
Using the Registry Editor
One of the best ways to disable the Windows key on your computer is by using the Registry Editor. However, before you begin, it’s important to back up the registry and create a restore point . This will ensure that your data remains safe even if something goes wrong during the editing process.
With that said, open the Start menu, type Registry Editor in the search bar, and press Enter.
In the Registry Editor, navigate to the following location:
`HKEY_LOCAL_MACHINE\SYSTEM\CurrentControlSet\Control\Keyboard Layout`
Right-click the “Keyboard Layout” key, select “New,” and choose “Binary Value.” Then, name the value “Scancode Map.”
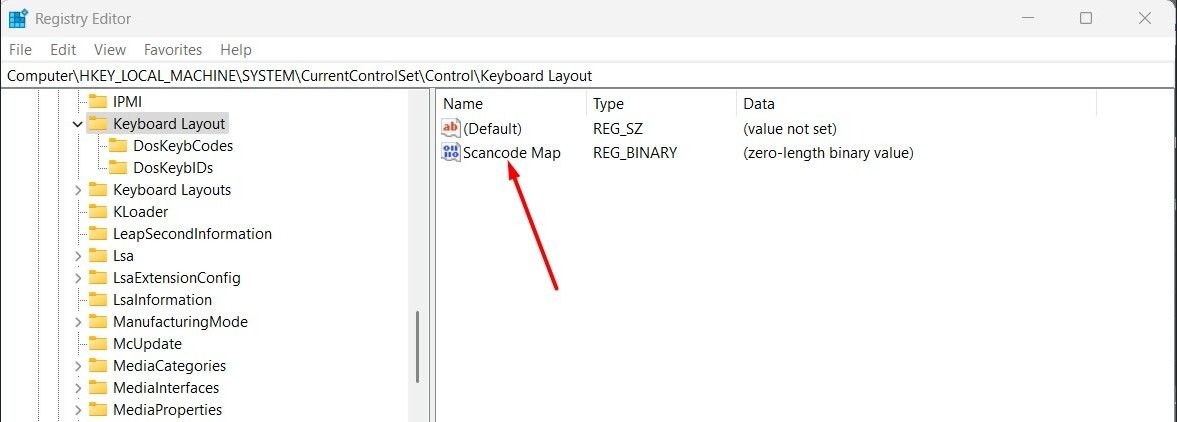
Right-click on the “Scancode Map” value and select “Modify.”
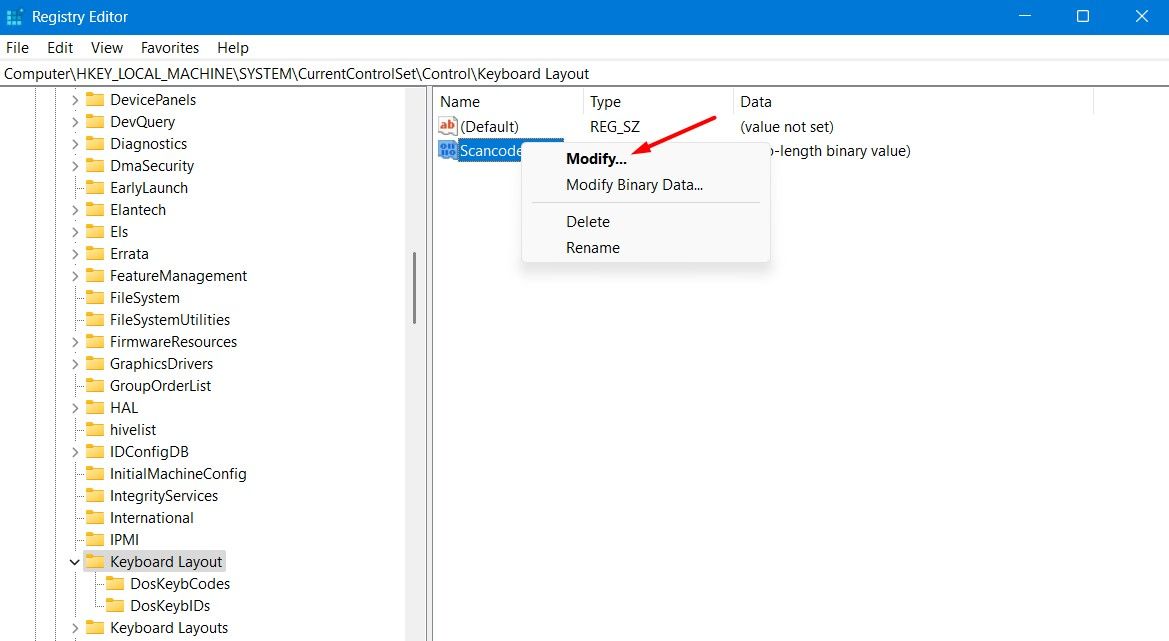
Type the following value in the “Value Data” field and click “OK.”
`00, 00, 00, 00, 00, 00, 00, 00
03, 00, 00, 00, 00, 00, 5B, E0,
00, 00, 5C, E0, 00, 00, 00, 00`
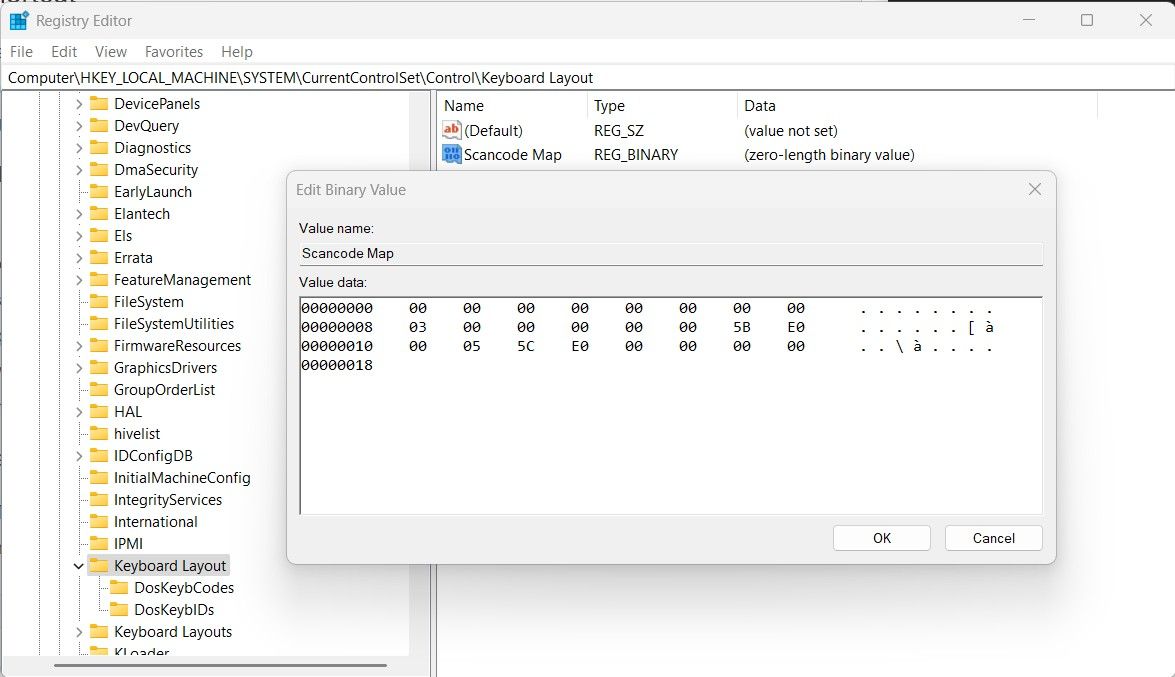
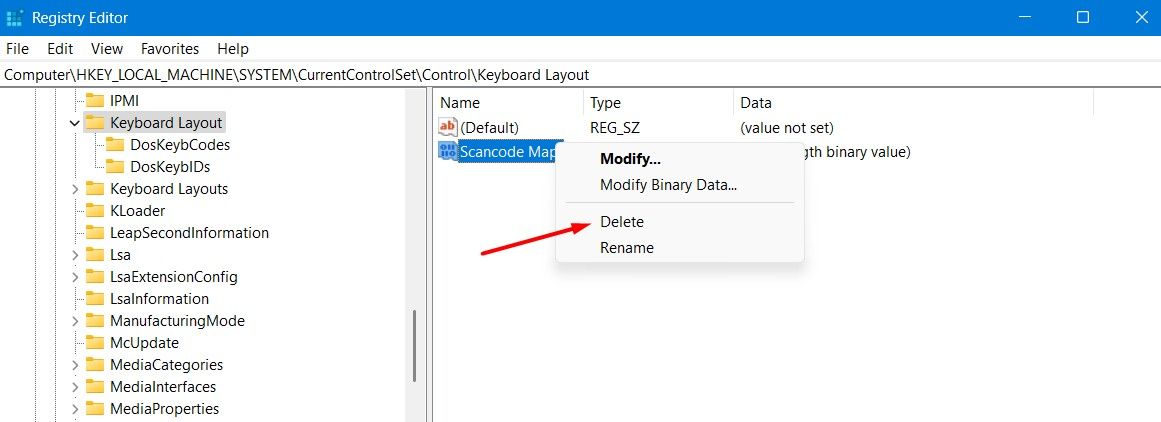
Afterward, restart your computer , and you’ll find that the Windows key is no longer functioning. To re-enable the Windows key in the future, simply delete the “Scancode Map” binary value from the Registry Editor, and the Windows key will start working again.
Using the Local Group Policy Editor
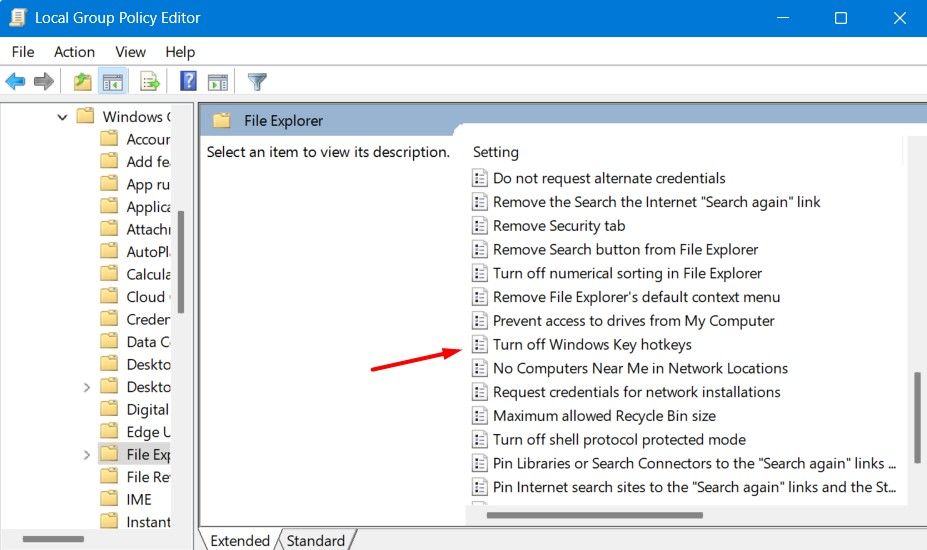
If you have Windows Pro or Enterprise edition, you can use the Local Group Policy Editor to disable the Windows key on your computer. To do this, open the Local Group Policy Editor and navigate to the following location:
`User Configuration > Administrative Templates > Windows Components > File Explorer`
In the right pane, double-click the “Turn Off Windows Key Hotkeys” policy.
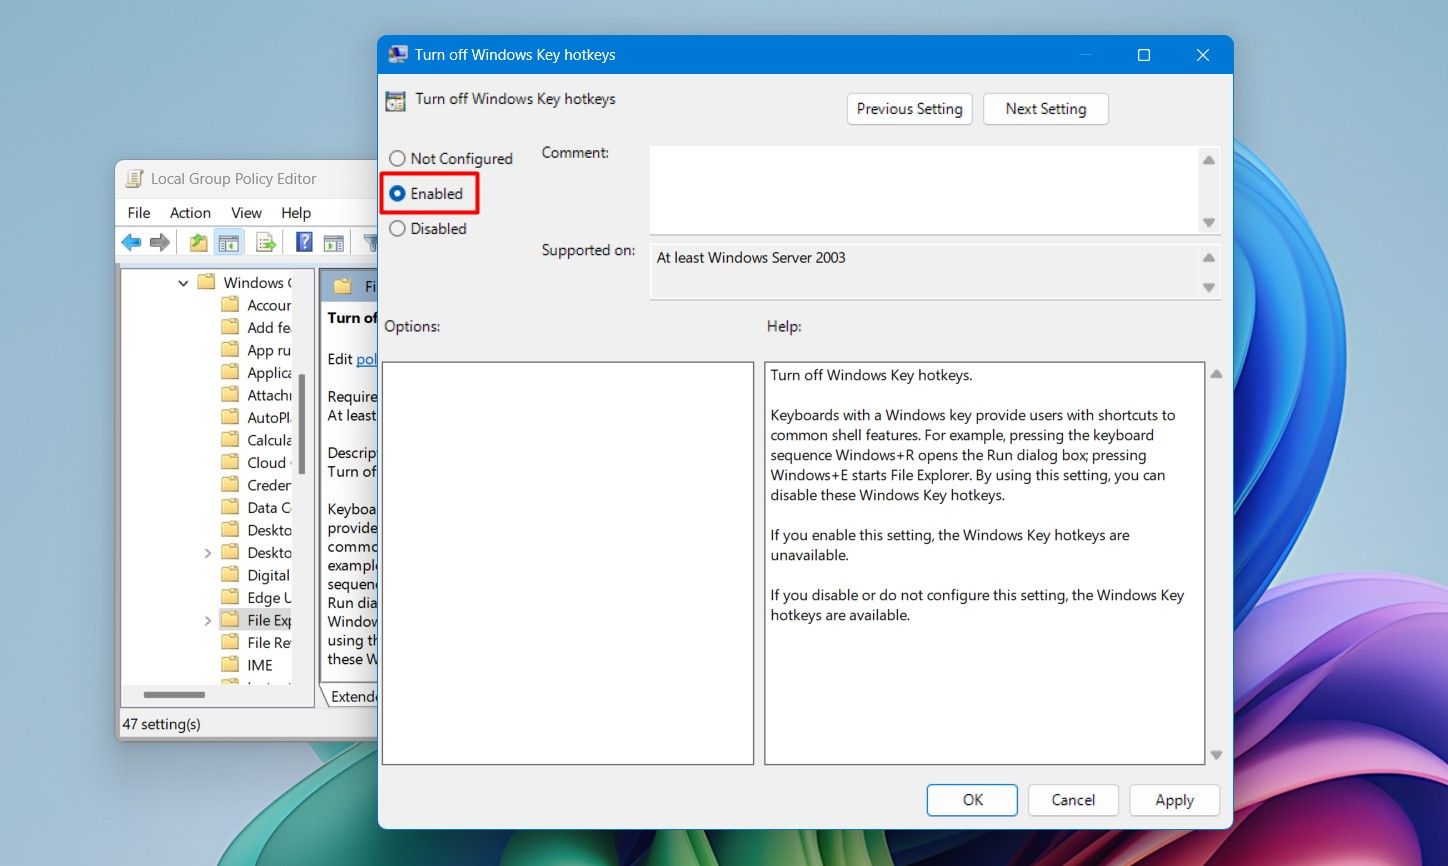
Select “Enabled,” then click “Apply” and “OK.”
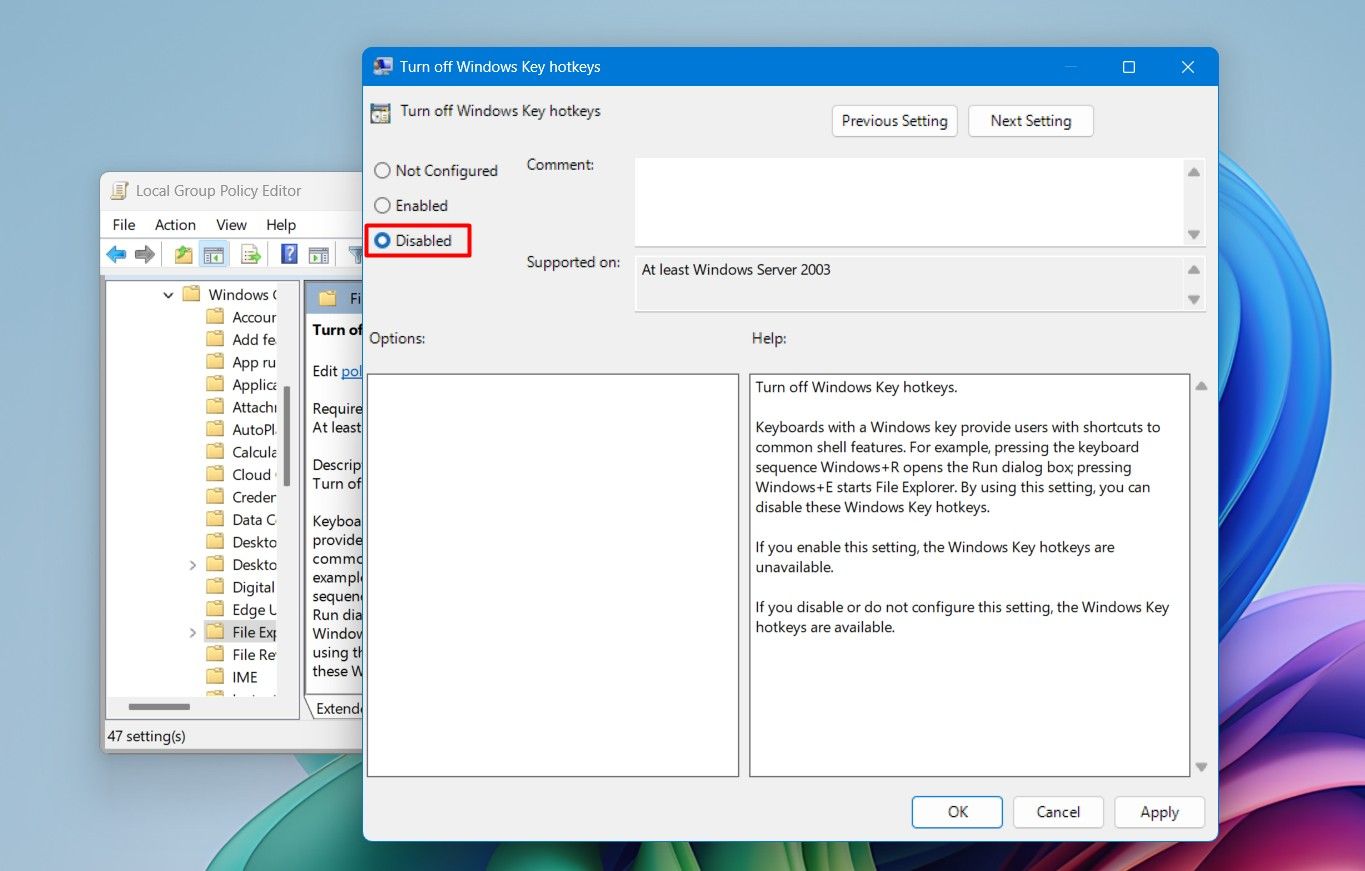
Then, restart your computer to see the changes. If you want to re-enable the Windows key, you’ll need to configure the “Turn Off Windows Key Hotkeys” policy to “Disabled” or “Not Configured.”
Using Microsoft PowerToys
Microsoft PowerToys is a free app from Microsoft that lets you disable keys on your Windows PC . To use it to disable the Windows key, first install it from the Microsoft Store and then open it.
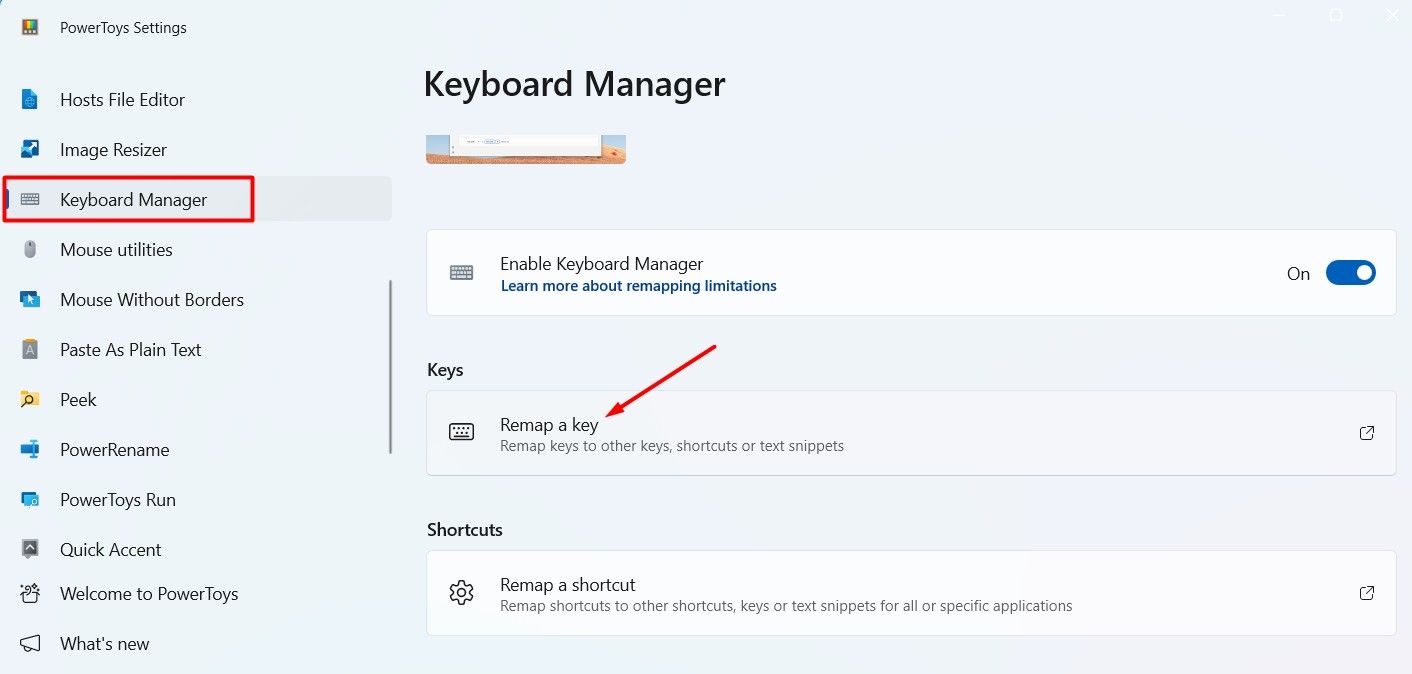
In the left sidebar, select “Keyboard Manager” and then click on “Remap a Key” in the right pane.
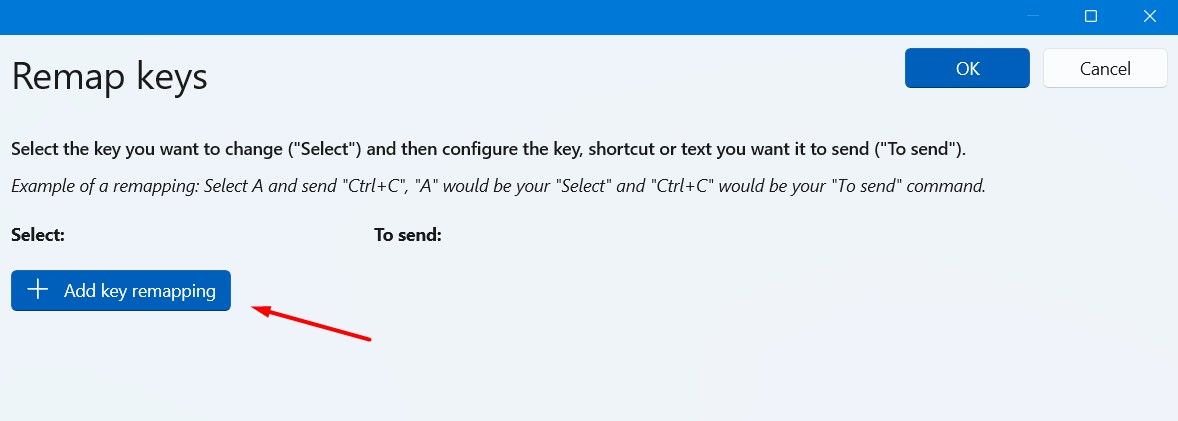
Choose “Add Key Remapping.”
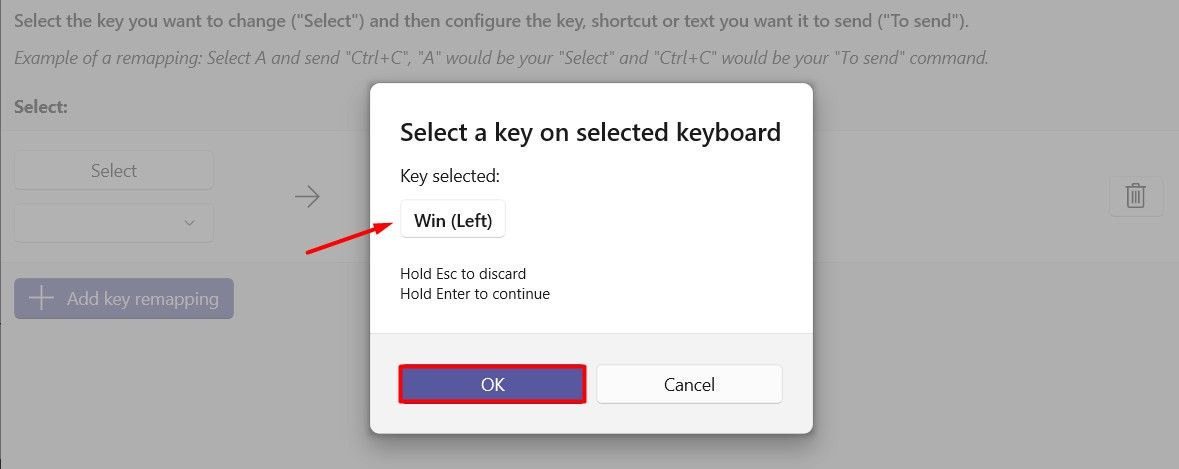
Click the “Select” button, and then press the “Windows” key on your keyboard. Click “OK” after selecting the key.
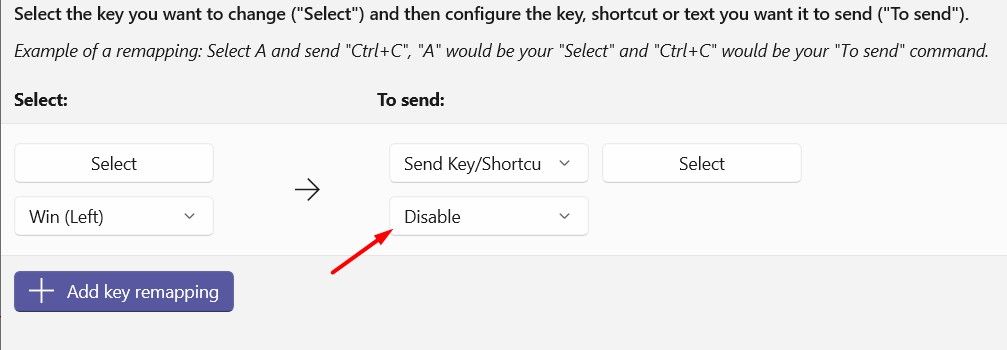
From the “To Send” drop-down menu, choose “Disable.”
Click “OK” and then select “Continue Anyway” to confirm disabling the Windows key.

When you want to start using the Windows key again, simply click the trash icon next to the key.
![]()
Using Your Keyboard Software
If you have a gaming keyboard , it likely has dedicated software that lets you configure how the keys work. Most gaming keyboards also have a gaming mode that, when enabled, disables keys that might interrupt your gaming session, including the Windows key.
For example, if you have an Alienware keyboard, you can use the Fn+F6 key combination to enable gaming mode. If you’re unaware of the key combination for your keyboard, check the user manual for more information.
How to Disable the Alt+Tab Shortcut
Pressing Alt+Tab opens the app switcher, which lets you see and switch between different programs running on your computer. However, you might not want to hit this key combination during an intense gaming session because it will minimize your game. You can prevent this from happening by temporarily disabling this shortcut.
Using Microsoft PowerToys
Similar to disabling the Windows key, you can also use Microsoft PowerToys to turn off the Alt+Tab shortcut. To do this, open Microsoft PowerToys, go to “Keyboard Manager,” select “Remap a Shortcut,” and then click “Add Shortcut Remapping.”

Click the pen icon next to “Shortcut,” press the “Alt+Tab” keys together, and click “OK.”
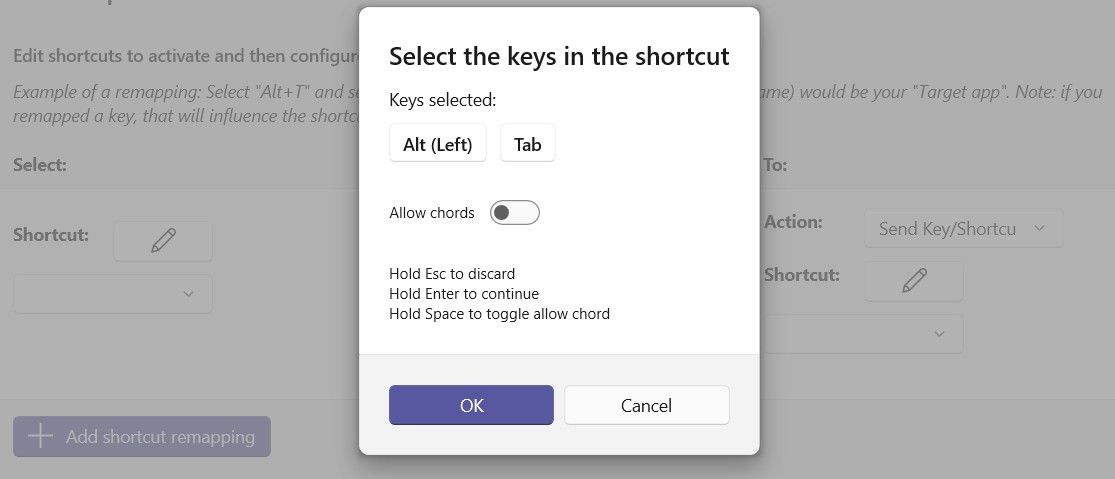
Choose “Disable” from the “Shortcut” dropdown menu under the “To” section.

Click “OK” to confirm the change.
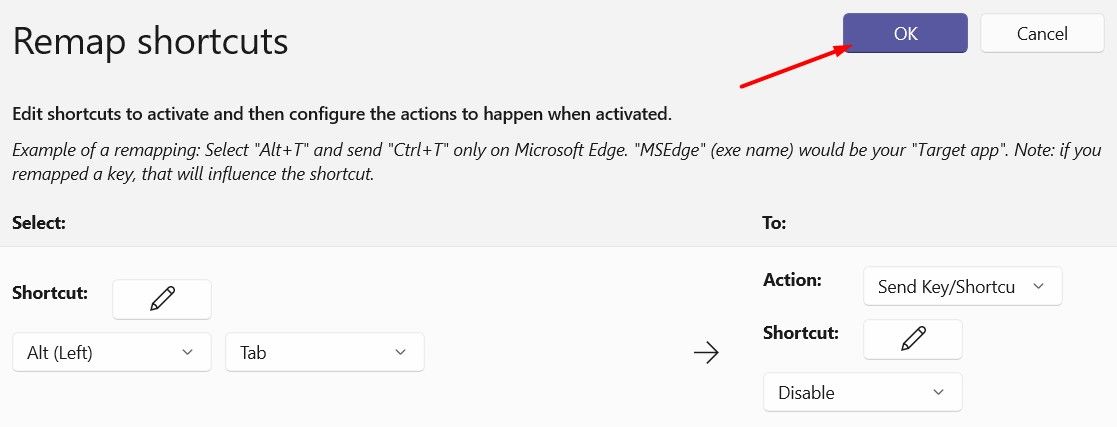
When you’re finished gaming on your computer, you can enable this shortcut combination again by clicking the trash can icon next to it.
![]()
Using AutoHotKey
AutoHotkey is a popular third-party tool that helps you manage keyboard shortcuts on your Windows computer. It allows you to disable specific keys or key combinations. To use it to disable the Alt+Tab shortcut, first, download and install AutoHotkey on your computer. Then, right-click anywhere on your desktop, select “New,” and then “AutoHotkey Script.”
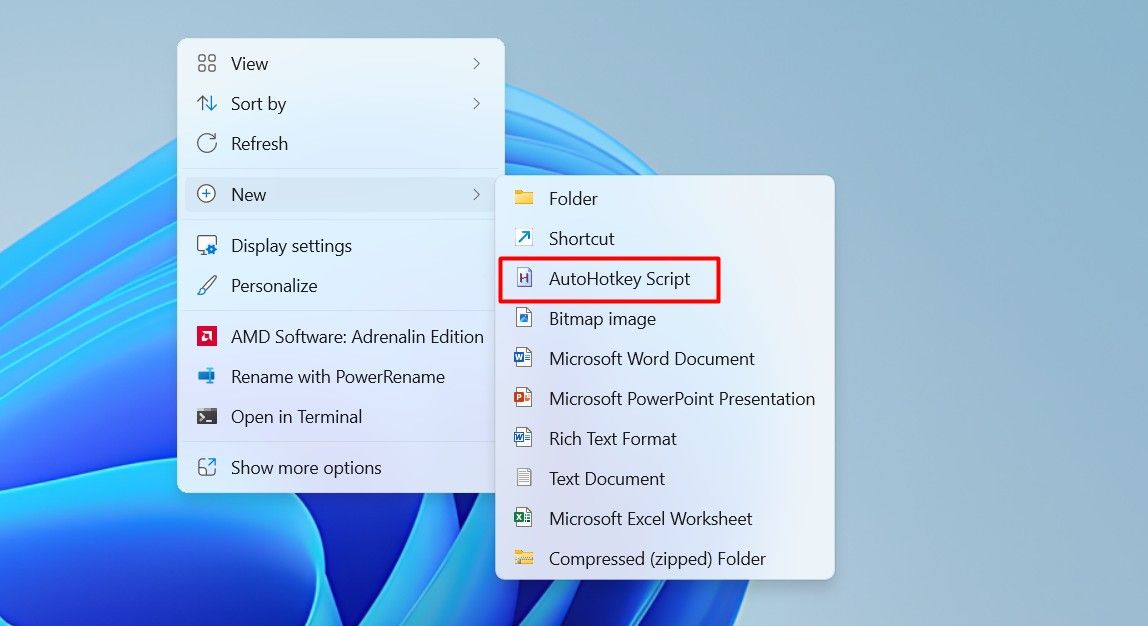
Give a name to the script file and press Enter.
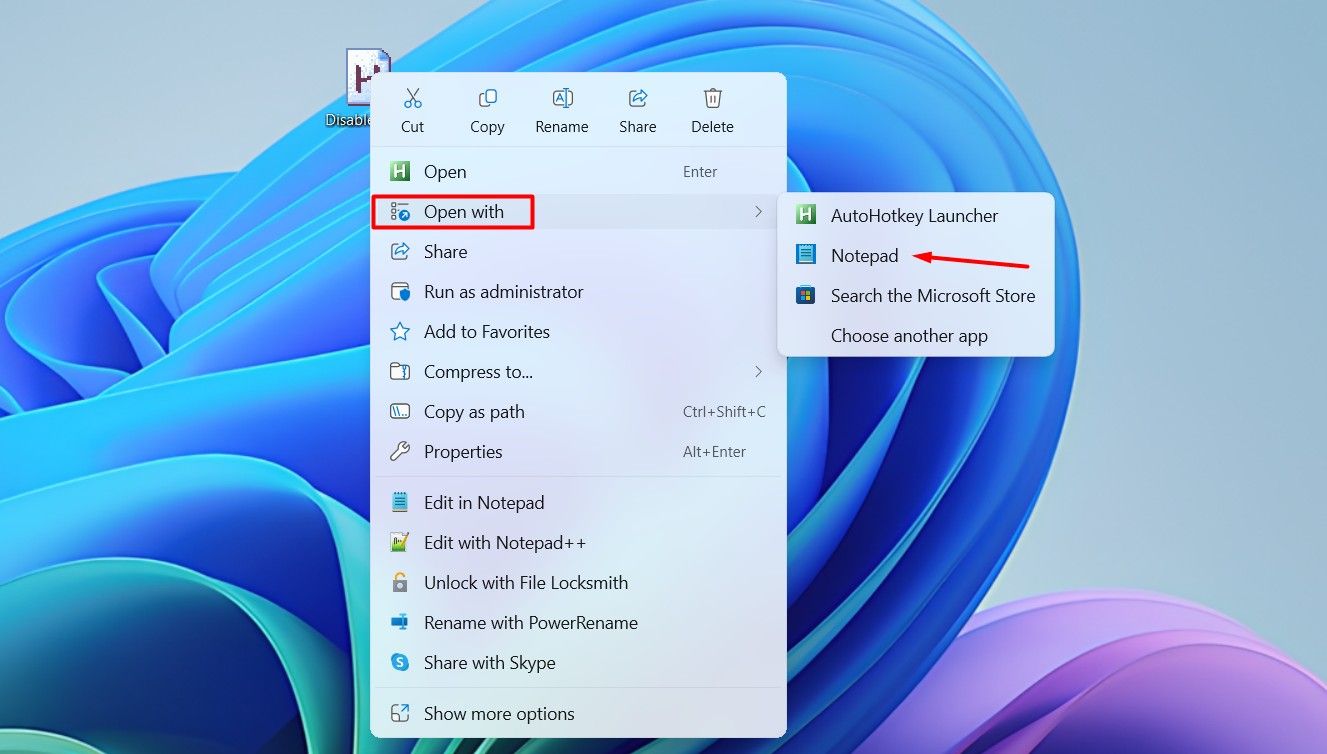
Right-click on the newly created script file, choose “Open With,” and select “Notepad.”
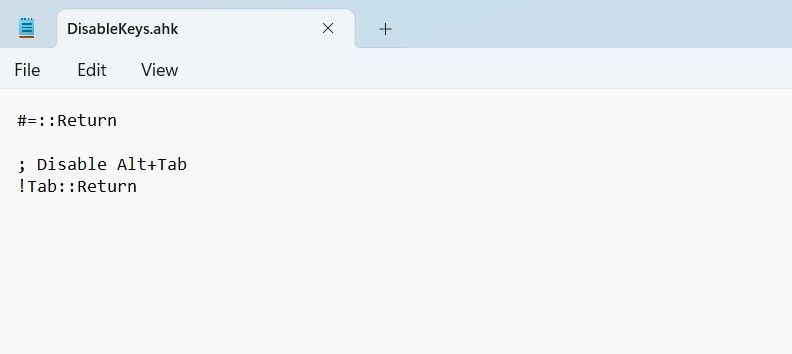
Clear any default text in the Notepad document, paste the following codes and press Ctrl+S to save the changes.
`#=::Return
; Disable Alt+Tab
!Tab::Return`
Go back to your desktop, right-click on the script file again, select “Show More Options,” and then choose “Run Script.”
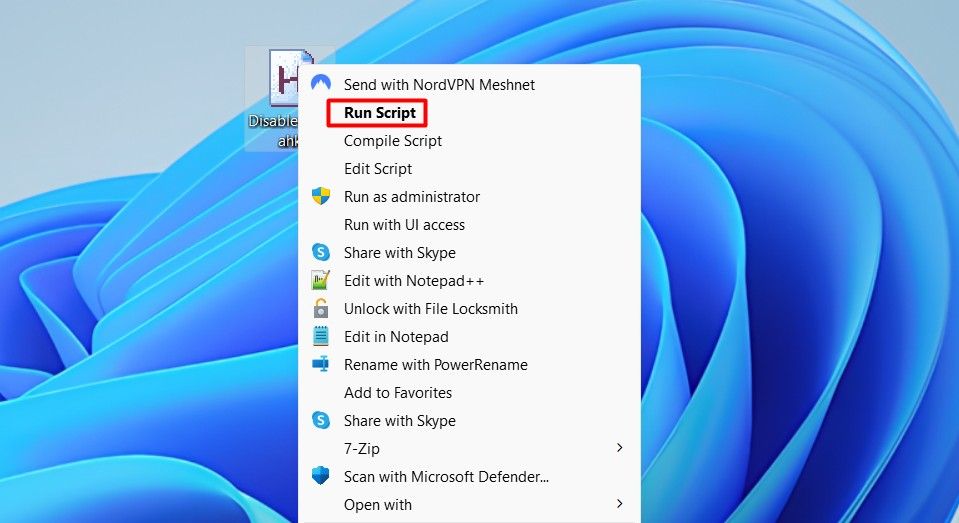
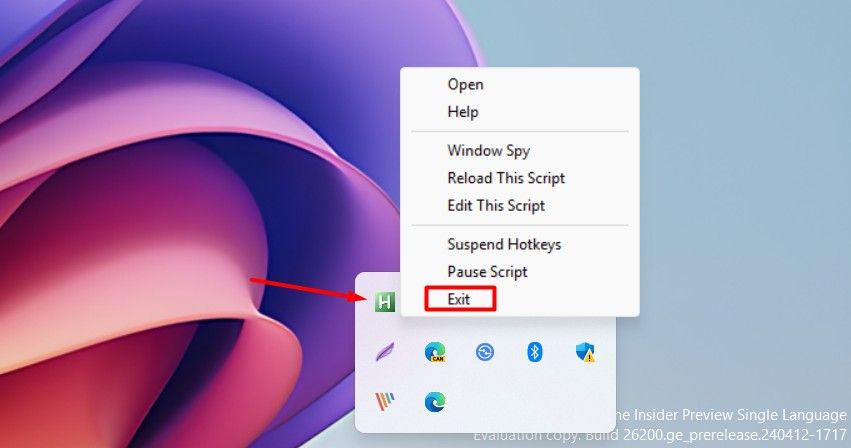
The Alt+Tab shortcut will now be disabled. To re-enable it, simply right-click on the AutoHotkey icon in the system tray and choose “Exit.”
How to Disable Sticky Keys
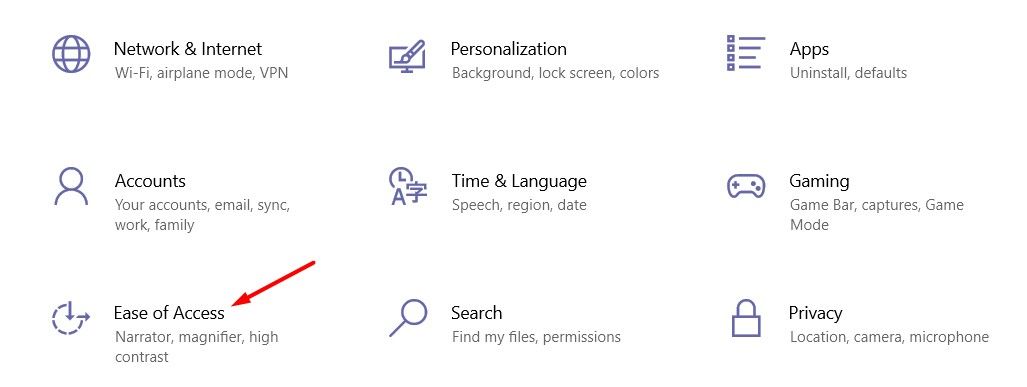
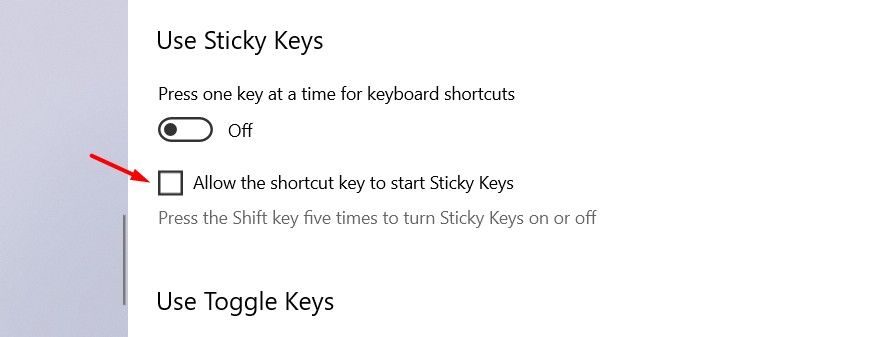
Both Windows 10 and 11 have a dedicated toggle for Sticky Keys in the Settings app. You can use this toggle to turn it on or off. To disable Sticky Keys on Windows 10, open the Settings menu and select “Ease of Access.”
From the left sidebar, choose “Keyboard” and disable the “Use Sticky Keys” toggle on the right.
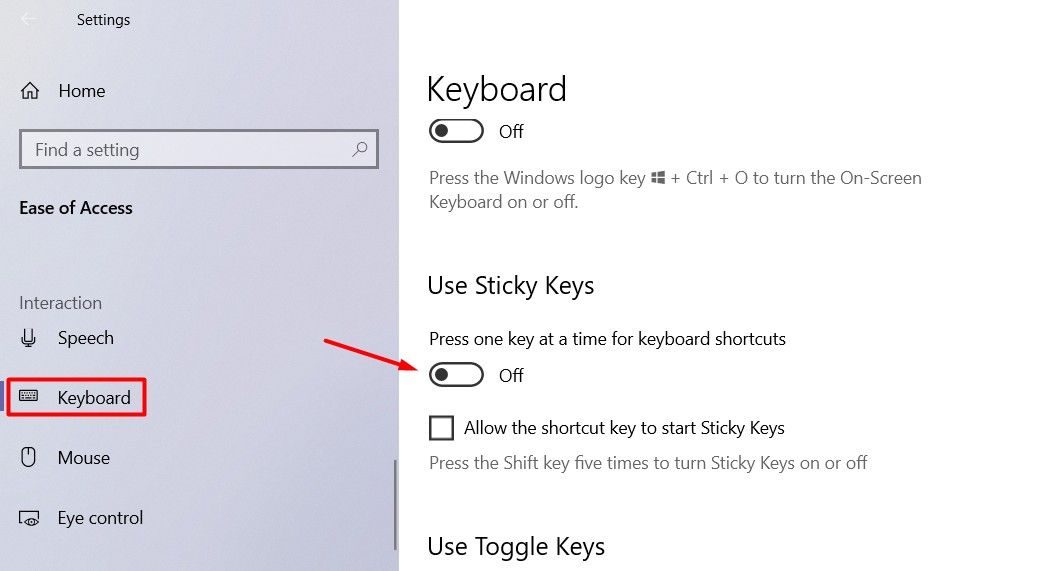
Then, uncheck the “Allow the shortcut key to start Sticky Keys” box.
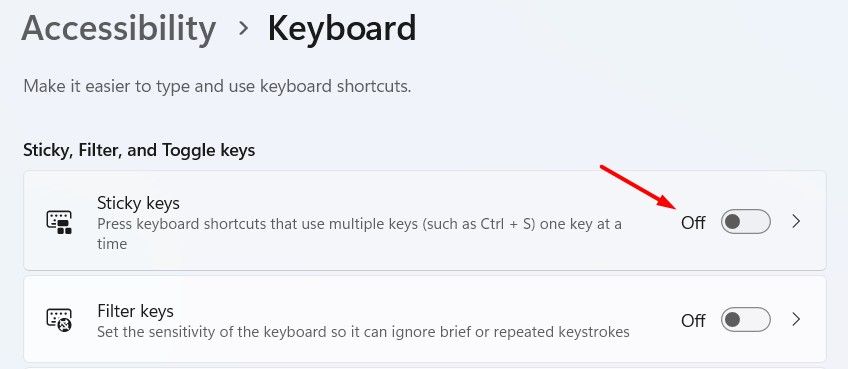
For Windows 11, open Settings, select “Accessibility” from the left-hand side, and disable the toggle switch for “Sticky Keys” on the right.
Click the “Sticky Keys” option and disable the keyboard shortcut for it.
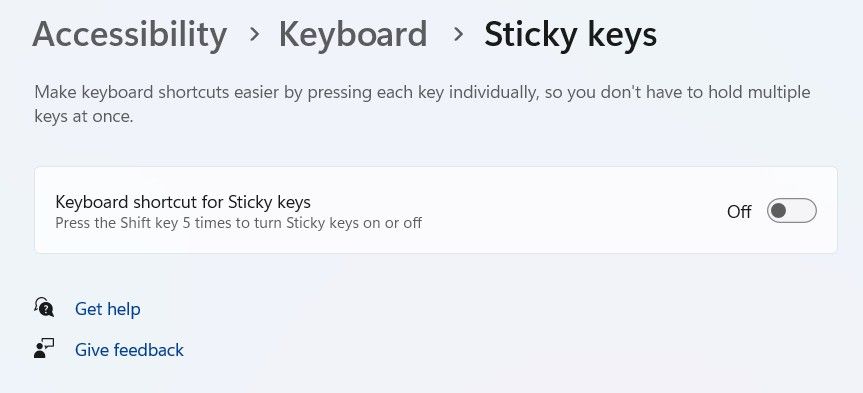
That’s it! You’ve successfully disabled Sticky Keys on your Windows computer. To enable it again in the future, simply turn the toggles back on.
This was all about how to disable certain keys and keyboard shortcuts on your Windows computer. Now you can enjoy uninterrupted gaming sessions without accidentally hitting those keys. However, remember to re-enable these keys and shortcuts later, as keeping them disabled permanently can disrupt your regular workflow in Windows.
Also read:
- [New] 2024 Approved Unlocking PPT's Potential with Voiceover Techniques
- [New] In 2024, Capturing Your Desktop in WinOSes Effortlessly
- [Updated] In 2024, Breaking the Boundaries VR Film Production Essentials (Top 9)
- [Updated] New Year, Updated LG 360 Full Review Insights
- Evil Genius nG Won’t Launch? Here's How to Troubleshoot and Fix It!
- Expert Moves for Sharing YouTube and Twitter on WhatsApp Platform
- Fixing ARK Crashes: Effective Methods for a Smoother User Experience
- Fixing the Unstoppable SnowRunner PC Glitch: A Guide to Stabilizing Your Gaming Experience
- Gaming Mastery The Ultimate Speed Controller Guidebook
- How to Change/Add Location Filters on Snapchat For your Vivo T2x 5G | Dr.fone
- How to Overcome the ‘Cannot Display Webpage’ Hurdle on IE
- In 2024, How to Remove Activation Lock On the iPhone 14 Without Previous Owner?
- Perfecting the Art of Facebook Live Recording for 2024
- Resolving the shlwapi.dll Missing Error: Step-by-Step Solutions
- Revive Your SteelSeries GG Controller: Troubleshooting the Non-Responsive Engine Issue in Windows
- Stop the Disruption: Effective Ways to Address Outlook's Crashing Problem
- Troubleshooting and Solving L4D2 Abrupt Shutdown Issues
- Troubleshooting PC and Xbox: Solving the Mystery of Mass Effect Legendary Edition Crashes
- Valorant PC Stability Issues Resolved? Expert Tips & Solutions
- Title: Optimizing PC Performance: Avoid Gaming Disruptions with Windows, Alt+Tab & Sticky Keys
- Author: Daniel
- Created at : 2024-12-04 18:57:38
- Updated at : 2024-12-06 17:17:25
- Link: https://win-answers.techidaily.com/optimizing-pc-performance-avoid-gaming-disruptions-with-windows-altplustab-and-sticky-keys/
- License: This work is licensed under CC BY-NC-SA 4.0.