Effective Guide: Turning Off Promotional Content & Suggestions on Your Windows 11 PC

Effective Guide: Turning Off Promotional Content & Suggestions on Your Windows 11 PC
Quick Links
- Why Do You See So Many Ads in Windows 11?
- Disable Ads From the Start Menu
- Remove Ads From the File Explorer
- Tweak Diagnostic Data Settings
- Tweak Device Usage Permissions
- Disable Ads From the Lock Screen
- Remove Recommendations From Windows Search
- Disable General Windows Permissions
Key Takeaways
- Remove suggested apps from the Start menu and disable ads in the File Explorer.
- Tweak diagnostic data and device usage permissions to stop personalized ads and recommendations.
- Turn off the Windows Spotlight feature and search highlights to remove ads from the lock screen and Windows Search.
Have you recently upgraded to Windows 11 and been bothered by unwanted ads and suggestions? Despite Microsoft’s claim that these ads improve the user experience, they can become overwhelming. Fortunately, you can easily disable them. Let’s take a look at how you can do that.
Why Do You See So Many Ads in Windows 11?
Microsoft is known to show advertisements in specific areas of its operating systems, like the Start menu, lock screen, File Explorer, or within certain apps. With Windows 11, the frequency of these ads has increased, aligning with the addition of more personalized features by Microsoft. But why does the company show these ads?
Microsoft claims these recommendations improve the user experience and help users optimize their operating system. These ads are personalized based on your interactions with the operating system and the apps and services you use. They aim to promote Microsoft products, services, or third-party apps in the Microsoft Store you might find helpful.
If you’re bothered by the constant stream of advertisements and recommendations throughout the operating system, you can easily disable them.
Disable Ads From the Start Menu
Have you ever opened the Start menu and noticed a list of pinned apps you don’t remember installing? Despite appearing as installed, these are merely suggested apps from Microsoft. Windows displays these apps based on your region, the types of apps you regularly use, and other factors.
However, like any other suggestion, the ultimate goal is to encourage you to install them. If that’s not something you’d like to do, you can remove these apps to declutter the revamped Start menu on Windows 11 . To remove a suggestion, click the Start button, right-click on the app you want to remove and select “Uninstall.” Then, confirm the uninstallation in the popup.
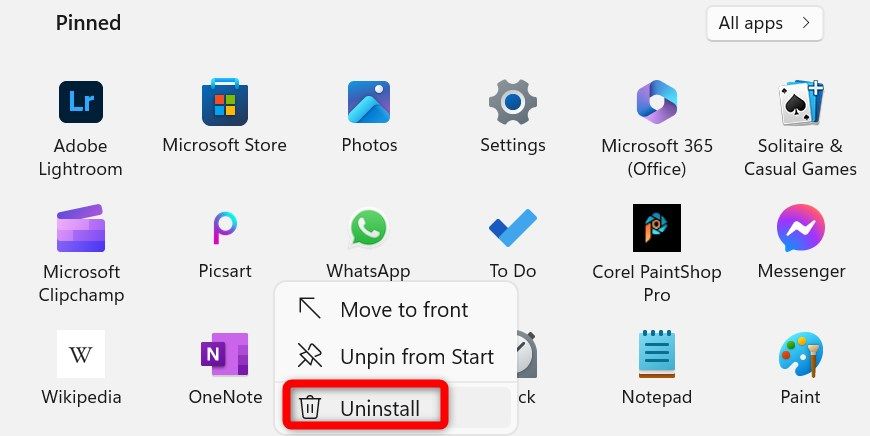
Repeat these steps to remove all suggested apps in the Start menu that you don’t plan to install or use.
You may find some installed apps pinned here, so be sure not to uninstall them. The context menu of installed apps displays options such as app settings, uninstall, and more. This is how you can distinguish them from suggested ones.
Remove Ads From the File Explorer
Have you ever opened File Explorer and been met with an ad offering you a discounted upgrade for your OneDrive storage?
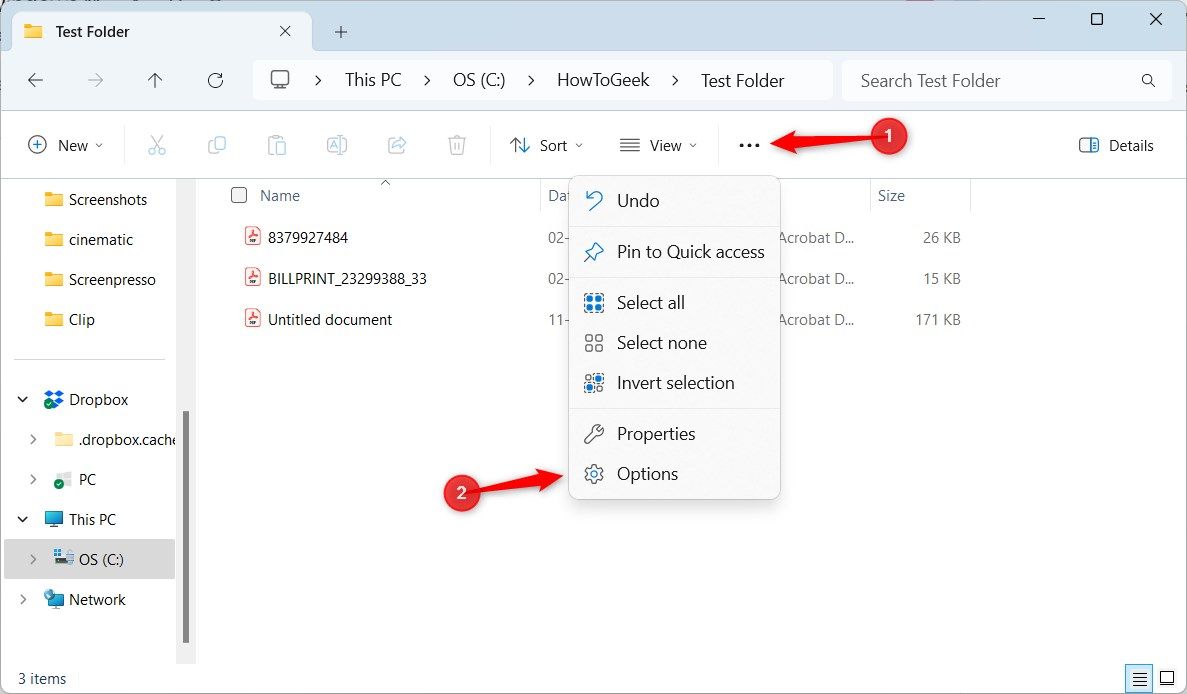
To disable those ads, open File Explorer by clicking on the folder icon on the taskbar. Click on the three horizontal dots at the far right of the command bar and select “Options.”
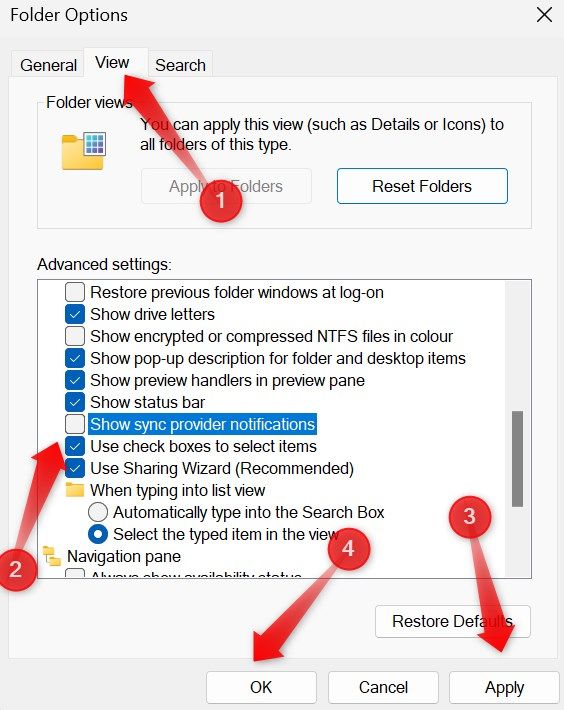
In the Folder Options window, go to the “View” tab and uncheck the box beside “Show Sync Provider Notifications.” After that, click “Apply” and then click “OK.”
Tweak Diagnostic Data Settings
To enhance the stability and performance of your computer, Microsoft collects diagnostic data about the issues you face and your interactions with the operating system. The company uses this information to fix the problems in upcoming Windows updates. This ensures your system operates securely and smoothly.
This data collection generally benefits you—after all, it allows Microsoft to improve the operating system—but it is also used to display ads and recommendations. This permission is typically enabled by default. If you want to stop Microsoft from doing this, you can quickly turn it off. Right-click the Start button and open “Settings.”
Navigate to the “Privacy and Security” tab on the left and go to “Diagnostics and Feedback” on the right.
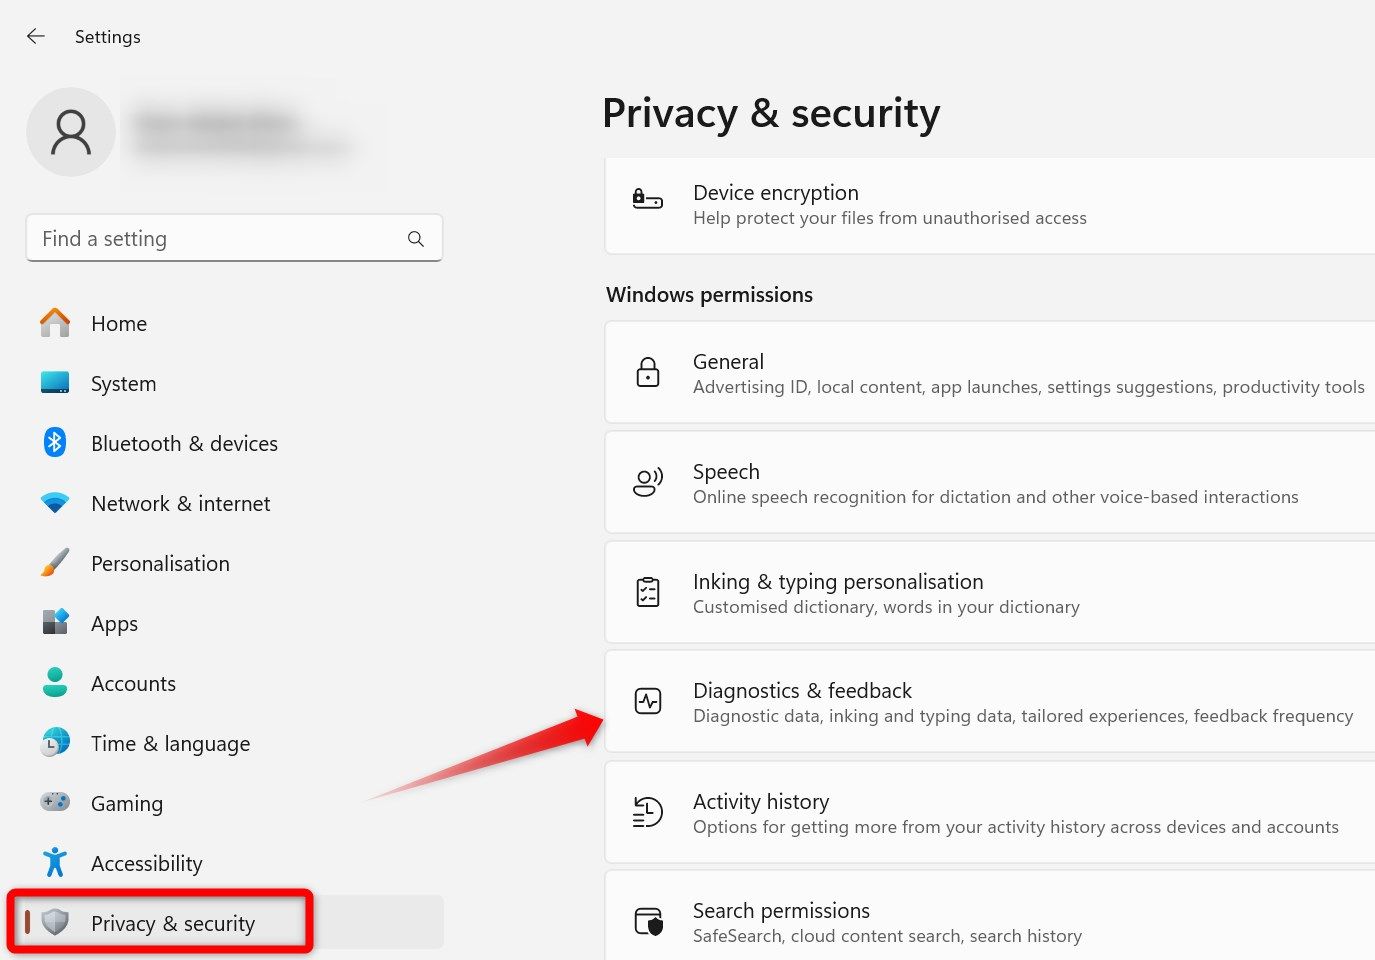
Expand the “Tailored Experiences” menu and turn off the toggle next to “Let Microsoft use your diagnostic data, excluding info about websites you browse, to enhance your product experiences with personalized tips, ads, and recommendations.”

Tweak Device Usage Permissions
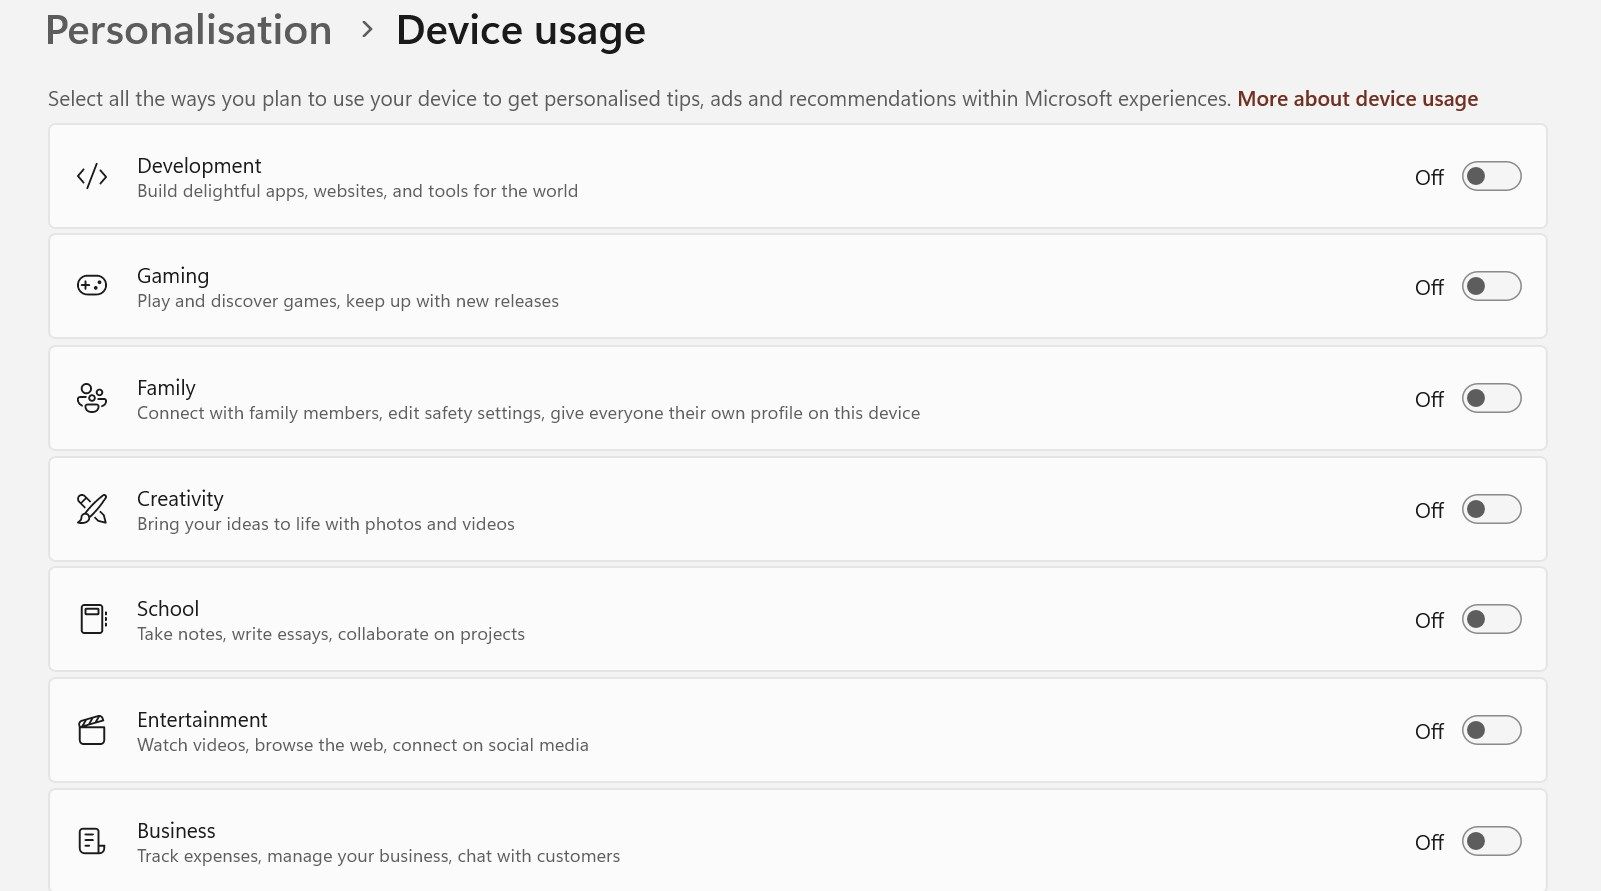
Microsoft allows you to specify how you intend to use your device, with use cases spanning business, entertainment, creativity, gaming, and more. Depending on your preferences, it tailors ads and recommendations to improve your overall experience.
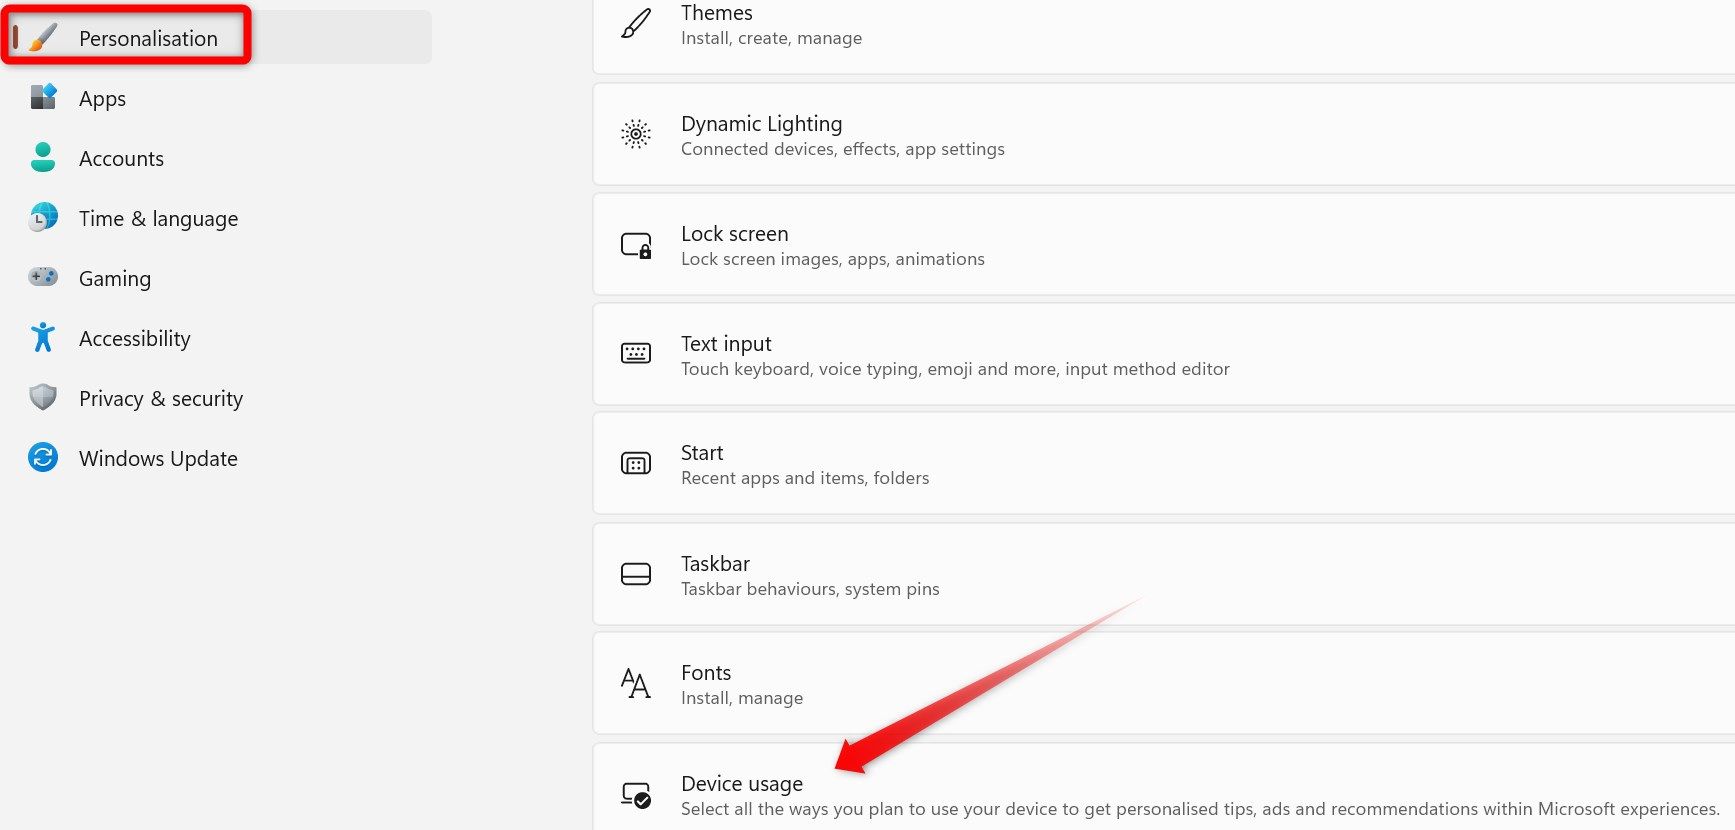
Typically, these permissions are not enabled by default. So, they won’t be enabled if you have never tweaked them. However, you should double-check to ensure they are disabled. To do so, right-click the Start button and open “Settings.” Navigate to the “Personalization” tab on the left and go to “Device Usage” on the right.
If any toggles next to various use cases are enabled, turn them off. This way, Microsoft will no longer show you ads based on how you use your device.
Disable Ads From the Lock Screen
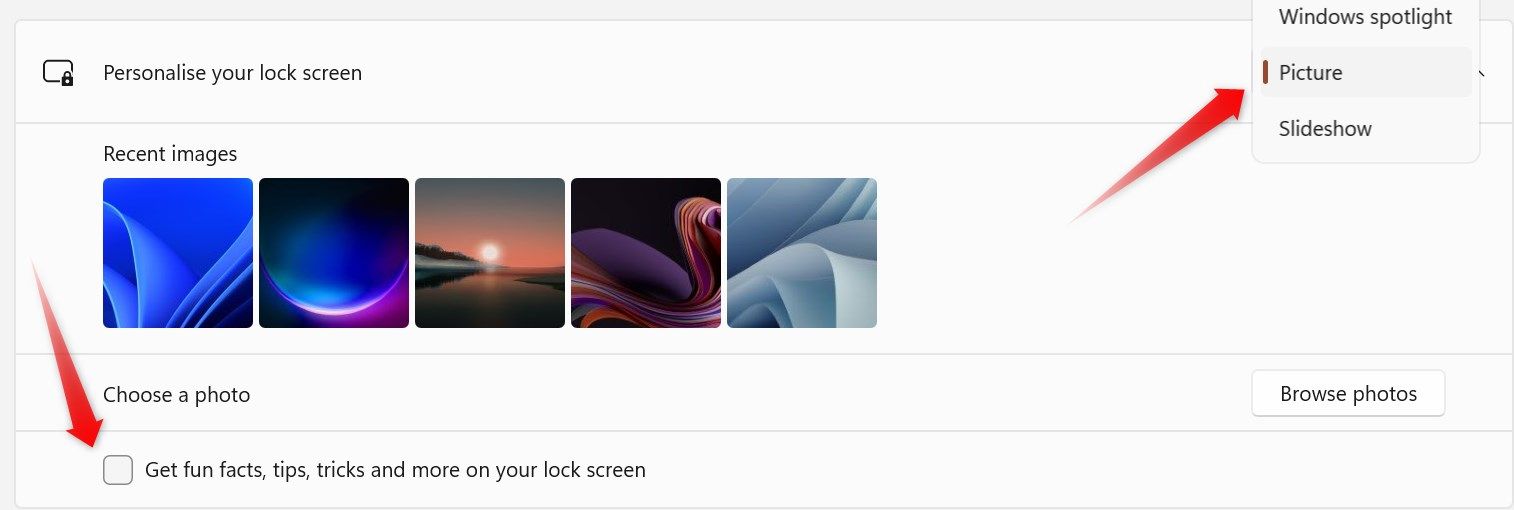
Even the Windows lock screen isn’t immune to ads and recommendations from Microsoft. When using the Windows spotlight feature that displays new background images on the lock screen, Windows doesn’t allow you to disable them. To declutter your lock screen, you’ll need to turn off the Windows spotlight feature entirely.
To do this, open the Settings app, navigate to the “Personalization” tab on the left, and go to the “Lock Screen” on the right. If Windows Spotlight is selected in the drop-down menu next to “Personalize Your Lock Screen,” select “Picture” or “Slideshow.” Then, uncheck the box next to “Get fun facts, tips, tricks, and more on your lock screen.”
Remove Recommendations From Windows Search
If you frequently use Windows Search to look for apps and files, you’ve likely encountered recommended games, recipes, popular videos, and more in the left sidebar of the Search menu. These content suggestions can be bothersome. To disable them, open the Settings app and navigate to Privacy and Security > Search Permissions.

Scroll down and uncheck the box below “Show Search Highlights.” Then, close the Settings app to allow the changes to take effect, and the search box will now be clutter-free.

Disable General Windows Permissions
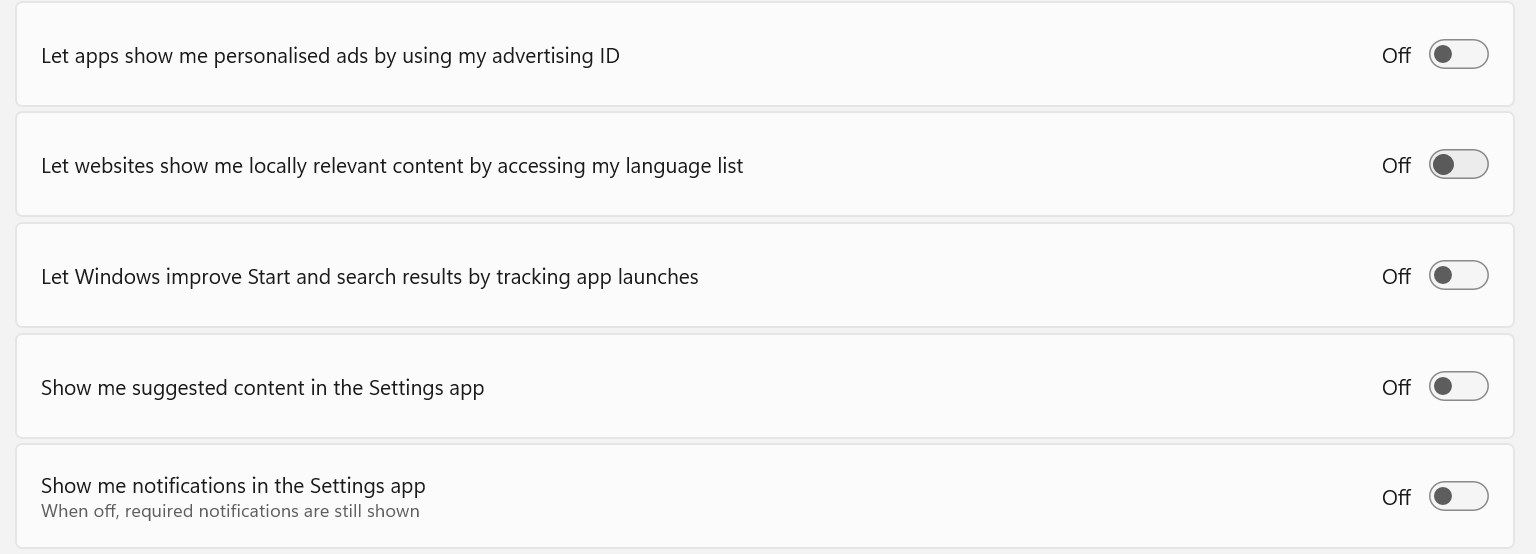
Several default Windows permissions favor more advertising. Disable them to stop seeing ads you encounter from other apps and within the Settings app. To do so, open the Settings app and navigate to Privacy and Security > General.

Turn off all the toggles enabled here, especially “Show me suggested content in the Settings app” and “Let apps show me personalized ads by using my advertising ID.”
That’s how you can stop receiving irritating ads and recommendations from Microsoft. If you continue encountering them despite turning off the above options, they probably originate from notification-spammy apps and your web browser. Find and uninstall such apps and turn off browser notifications to enjoy a cleaner and clutter-free experience.
Also read:
- [Updated] The Digital Archivist's Toolkit Downloading Videos From Messenger
- 2024 Approved Decode the Digital Dollar with YouTube An Effective Triple Step Method for Income Analysis
- Detailed guide of ispoofer for pogo installation On Xiaomi Redmi Note 13 Pro+ 5G | Dr.fone
- Download Nvidia Quadro Driver Latest Version Compatible with Windows 10
- Fix It! The Ultimate Guide to Solving Your iPhone's Camera Glitches - Top 7 Causes Unveiled
- Fix Roblox PC Issues Fast: Top 6 Solutions for Uninterrupted Gaming
- Maximize Fluidity of Play - Tips to Combat Lag and Boost FPS on Watch Dogs: Legion
- Maximizing Playtime: Effective Strategies to Upgrade Your Xbox's Performance
- Optimizing System Settings to Stop Crashes in Total War: RAVEN GEAR - PC Gameplay
- Top Anker Super Bright Flashlight: Ultimate Guide to a Rugged, High-Lumen Outdoor Light
- Top Apple Offers During Prime Day Sale
- Troubleshooting Guide: Stop Dota 2 From Keeping You Down!
- Troubleshooting: Why Your DS4 Isn't Working With Windows and What To Do Next
- What Pokémon Evolve with A Dawn Stone For Vivo Y78 5G? | Dr.fone
- Title: Effective Guide: Turning Off Promotional Content & Suggestions on Your Windows 11 PC
- Author: Daniel
- Created at : 2024-11-22 22:30:07
- Updated at : 2024-11-26 22:47:08
- Link: https://win-answers.techidaily.com/effective-guide-turning-off-promotional-content-and-suggestions-on-your-windows-11-pc/
- License: This work is licensed under CC BY-NC-SA 4.0.